
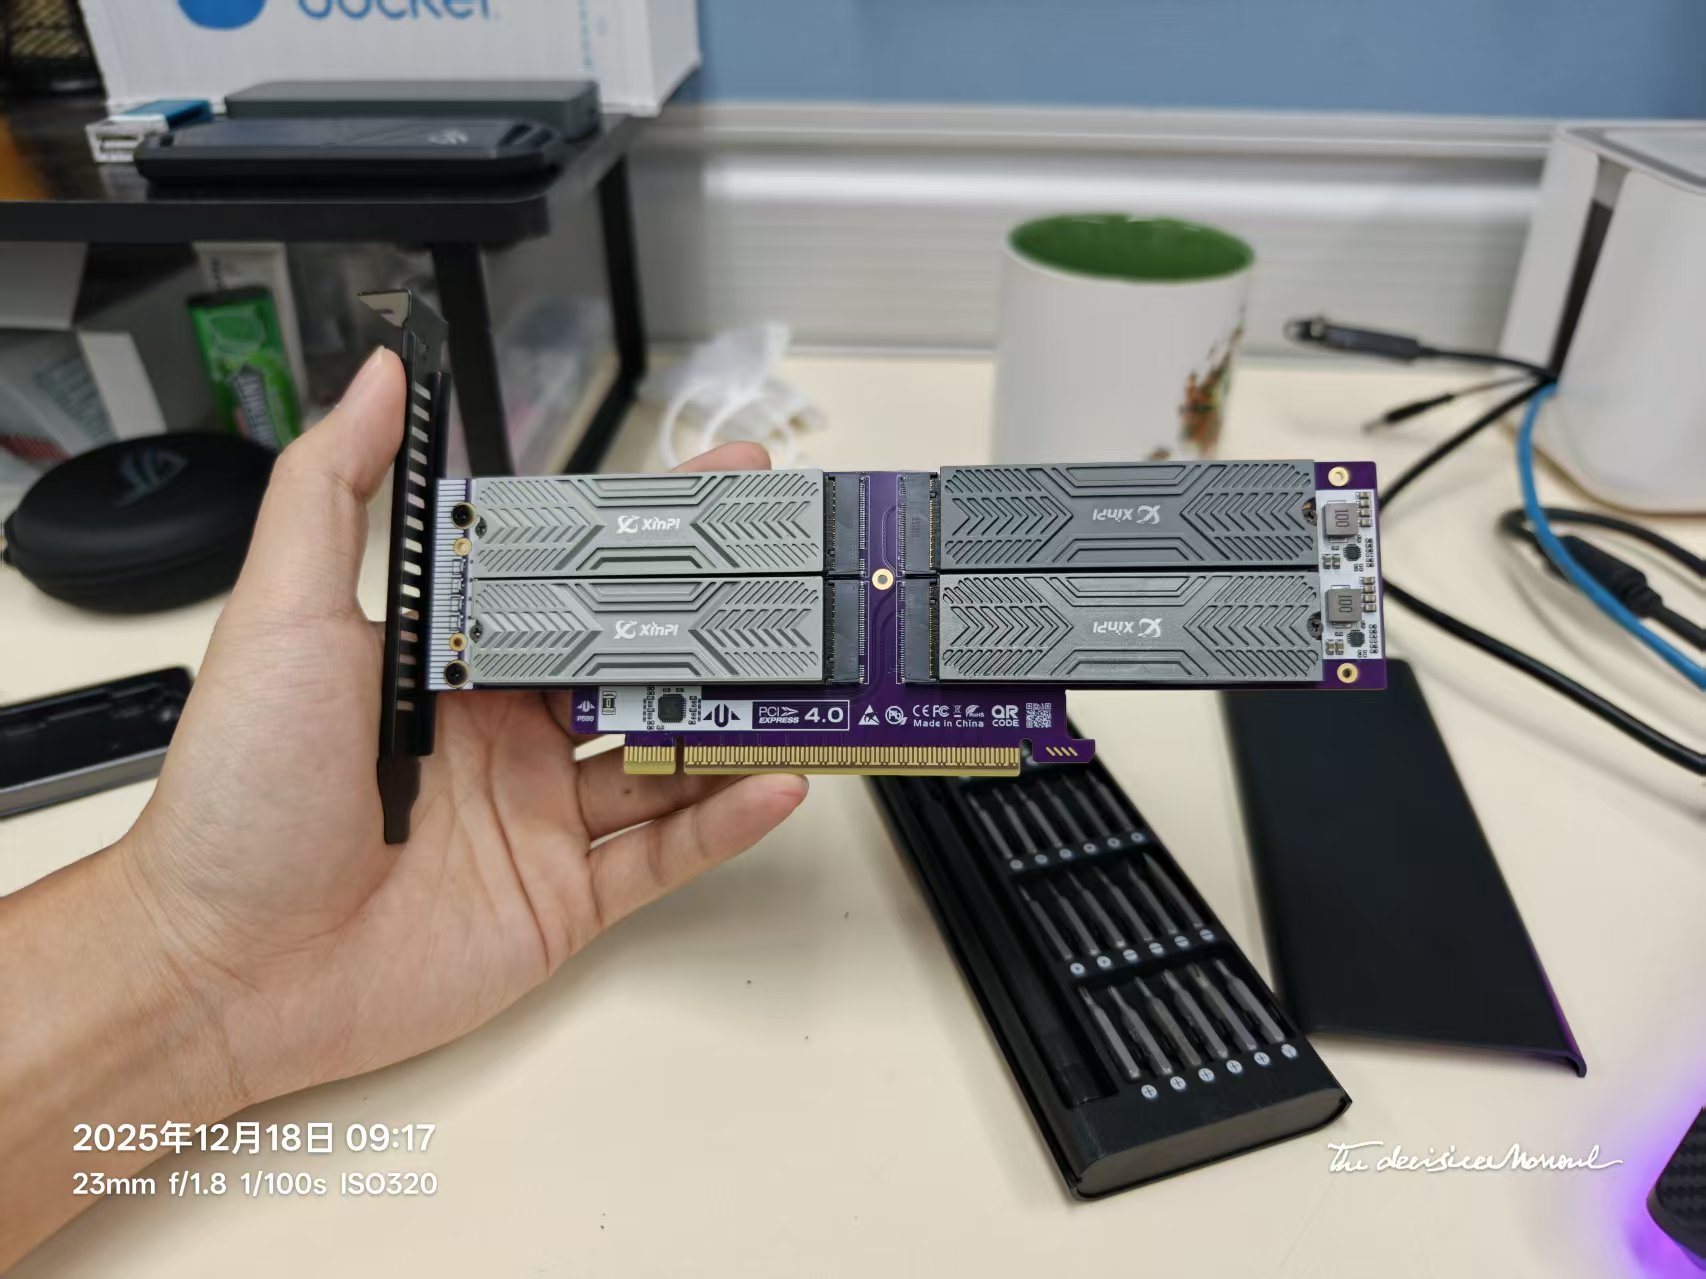
本文记录在 Dell PowerEdge R750 上部署四张 AX650N、安装与升级 AXCL、编译 ax-llm、准备量化模型,以及进行单卡和四卡并发推理测试的完整流程。
本文只描述正常安装和测试流程,不包含故障排查内容。命令默认在 Ubuntu 服务器中执行。
1. 最终测试环境
| 项目 | 配置 |
|---|---|
| 服务器 | Dell PowerEdge R750 |
| 操作系统 | Ubuntu 24.04.2 LTS |
| CPU 架构 | x86_64 |
| Linux 内核 | 6.14.0-27-generic |
| 加速卡 | 4×AX650N |
| PCIe 配置 | x16 插槽拆分为 x4+x4+x4+x4 |
| AXCL | 3.16.0 |
| 测试模型 | AXERA-TECH/Qwen3-0.6B-GPTQ-Int4 |
| 模型大小 | 约 1.64 GiB |
| 推理程序 | axllm |
已核验的基础编译工具版本:
git --version
cmake --version | head -n 1
g++ --version | head -n 1
测试时的版本分别为:
git version 2.43.0
cmake version 3.28.3
g++ 13.3.0
2. 硬件和 BIOS 前置配置
四张 AX650N 通过四口 PCIe 转接板安装在一个全长 PCIe x16 插槽上。该转接板按四组独立 PCIe 通道连接四张卡,因此服务器 BIOS 需要启用插槽拆分。
在 R750 BIOS 中进入:
System BIOS Settings
└── Integrated Devices
    └── Slot Bifurcation
对安装转接板的实际插槽选择:
x4 Bifurcation在该 BIOS 中,这个选项表示将 x16 拆分成四组 x4,即:
x4 + x4 + x4 + x4保存设置并重新启动服务器。
3. 安装 AXCL 前的系统准备
3.1 确认系统架构和内核
uname -m
uname -r
cat /etc/os-release
R750 使用 Intel/AMD x86_64 平台,因此应选择文件名中带有 x86_64、扩展名为 .deb 的 AXCL Host 安装包。
不同文件的用途如下:
| 文件关键词 | 适用平台 |
|---|---|
axcl_host_x86_64_*.deb | Intel/AMD + Ubuntu/Debian,本机使用 |
axcl_host_x86_64_*.rpm | Intel/AMD + CentOS/RHEL |
axcl_host_aarch64_* | ARM64 主机 |
axcl_host_loongarch64_* | 龙芯主机 |
AX650_card_*.axp | 卡端完整烧录镜像,普通 Host 安装不使用 |
3.2 安装编译依赖和当前内核头文件
sudo apt update
sudo apt install -y build-essential git cmake pkg-config
sudo apt install -y linux-headers-$(uname -r)
确认内核头文件已经就绪:
ls -ld /lib/modules/$(uname -r)/build4. 首次安装 AXCL Host
假设 AXCL 3.10.2 安装包已经复制到:
/home/XXX/AXCL/axcl_host_x86_V3.10.2/进入安装包目录:
cd /home/XXX/AXCL/axcl_host_x86_V3.10.2
ls -lh
安装 x86_64 Ubuntu 软件包:
sudo apt install -y ./axcl_host_x86_64_V3.10.2*.deb安装脚本提示后重新加载环境变量:
source /etc/profile重新启动服务器,使驱动和卡端固件完整加载:
sudo reboot重新登录后验证:
dpkg-query -W -f='${Package} ${Version} ${Status}\n' axclhost
command -v axcl-smi
/usr/bin/axcl/axcl-smi
开发文件的安装位置可以这样检查:
test -d /usr/include/axcl && echo "AXCL headers: OK"
test -d /usr/lib/axcl && echo "AXCL libraries: OK"
5. 将 AXCL 从 3.10.2 升级到 3.16.0
本次使用的安装包为:
/home/XXX/AXCL/axcl_host_x86_V3.16.0/
axcl_host_x86_64_V3.16.0_Y01_20260623175242_Alpha_20260814074528.deb
5.1 核验安装包
cd /home/XXX/AXCL/axcl_host_x86_V3.16.0
ls -lh *.deb
查看软件包名称、版本和架构:
dpkg-deb -f ./axcl_host_x86_64_V3.16.0_Y01_20260623175242_Alpha_20260814074528.deb Package Version Architecture预期包含:
Package: axclhost
Version: 3.16.0
5.2 停止推理服务
如果使用了本文后面的四卡管理脚本:
~/axcl-samples-main/ax-llm/axllm_4cards.sh stop确认没有残留的 axllm 进程:
pgrep -af axllm没有输出表示已经停止。
5.3 卸载旧版并安装新版
先确认当前版本:
dpkg-query -W -f='${Package} ${Version} ${Status}\n' axclhost卸载旧版:
sudo apt remove axclhost安装 3.16.0:
sudo apt install -y /home/XXX/AXCL/axcl_host_x86_V3.16.0/axcl_host_x86_64_V3.16.0_Y01_20260623175242_Alpha_20260814074528.deb重新加载环境并核验软件包:
source /etc/profile
dpkg-query -W -f='${Package} ${Version} ${Status}\n' axclhost
确认新驱动模块安装在当前内核目录中:
modinfo -F filename axcl_host
modinfo -F vermagic axcl_host
本机预期的 vermagic 开头为:
6.14.0-27-generic5.4 重启并验证升级结果
sudo reboot重新登录后执行:
/usr/bin/axcl/axcl-smi确认以下三处均为 3.16.0:
AXCL-SMIDriver- 每张卡的
Firmware
AXCL Host 软件包会提供匹配的卡端固件,默认位置为:
/lib/firmware/axcl/ax650_card.pac可以确认文件是否存在:
ls -lh /lib/firmware/axcl/ax650_card.pac6. 获取并编译 ax-llm
6.1 源码目录
本次源码位于:
/home/XXX/axcl-samples-main/axllm/ax-llm如果从 Git 仓库重新获取,可以使用:
mkdir -p ~/axcl-samples-main/axllm
cd ~/axcl-samples-main/axllm
git clone --branch axllm https://github.com/AXERA-TECH/ax-llm.git
cd ax-llm
检查源码和分支:
git branch --show-current
ls
预期分支为:
axllm6.2 编译 x86 AXCL 版本
cd ~/axcl-samples-main/axllm/ax-llm
chmod +x build_axcl_x86.sh install.sh
./build_axcl_x86.sh
编译完成后安装:
sudo ./install.sh验证安装结果:
command -v axllm
axllm version
axllm --help
正常情况下程序位于:
/usr/bin/axllmaxllm 本身是推理运行时和服务程序,不包含模型权重。模型目录需要另外准备,其中包含配置、Tokenizer 和 AXERA 编译后的 .axmodel 文件。
7. 准备 Qwen3-0.6B-GPTQ-Int4 模型
模型仓库:
AXERA-TECH/Qwen3-0.6B-GPTQ-Int47.1 在 Linux 服务器上使用 hf 下载
创建独立 Python 虚拟环境:
python3 -m venv ~/hf-env
source ~/hf-env/bin/activate
python -m pip install --upgrade pip
python -m pip install --upgrade huggingface_hub
验证 CLI:
hf --version创建模型目录并下载:
mkdir -p ~/axcl-samples-main/ax-llm/models/Qwen3-0.6B-GPTQ-Int4
cd ~/axcl-samples-main/ax-llm/models/Qwen3-0.6B-GPTQ-Int4
hf download AXERA-TECH/Qwen3-0.6B-GPTQ-Int4 --local-dir . --max-workers 4
7.2 在 Windows 上下载后复制到服务器
Windows PowerShell 中设置下载目录:
$ModelDir = "$env:USERPROFILE\Downloads\Qwen3-0.6B-GPTQ-Int4"
New-Item -ItemType Directory -Force -Path $ModelDir
下载模型:
hf download AXERA-TECH/Qwen3-0.6B-GPTQ-Int4 --local-dir $ModelDir --max-workers 4查看下载后的总大小:
"{0:N2} GiB" -f ((Get-ChildItem $ModelDir -Recurse -File | Measure-Object Length -Sum).Sum / 1GB)将整个目录复制到服务器的以下位置:
/home/XXX/axcl-samples-main/ax-llm/models/Qwen3-0.6B-GPTQ-Int47.3 检查模型目录
cd ~/axcl-samples-main/ax-llm/models/Qwen3-0.6B-GPTQ-Int4
ls -lah
ls -lh config.json post_config.json qwen3_tokenizer.txt
find . -maxdepth 1 -type f -name '*.axmodel' -printf '%f %k KiB\n'
主要文件结构为:
Qwen3-0.6B-GPTQ-Int4/
├── config.json
├── post_config.json
├── qwen3_tokenizer.txt
└── *.axmodel
8. 单卡交互式推理测试
定义模型目录:
MODEL_DIR="$HOME/axcl-samples-main/ax-llm/models/Qwen3-0.6B-GPTQ-Int4"在 Card 0 上运行:
AXLLM_DEVICES=0 axllm run "$MODEL_DIR"依次测试其他卡:
AXLLM_DEVICES=1 axllm run "$MODEL_DIR"
AXLLM_DEVICES=2 axllm run "$MODEL_DIR"
AXLLM_DEVICES=3 axllm run "$MODEL_DIR"
进入交互界面后,可以直接输入问题,例如:
who are you常用交互命令:
| 命令 | 功能 |
|---|---|
/q 或 /exit | 退出 |
/reset | 清空 KV Cache |
/dd | 删除上一轮对话 |
/pp | 打印历史对话 |
Ctrl+C | 停止当前生成 |
另开终端观察设备状态:
watch -n 1 /usr/bin/axcl/axcl-smi9. 四张卡分别启动 HTTP 服务
四张卡分别使用一个 axllm 进程和一个端口:
| Card | 环境变量 | HTTP 端口 |
|---|---|---|
| 0 | AXLLM_DEVICES=0 | 8000 |
| 1 | AXLLM_DEVICES=1 | 8001 |
| 2 | AXLLM_DEVICES=2 | 8002 |
| 3 | AXLLM_DEVICES=3 | 8003 |
9.1 手动启动方式
分别打开四个终端,设置相同的模型目录:
MODEL_DIR="$HOME/axcl-samples-main/ax-llm/models/Qwen3-0.6B-GPTQ-Int4"终端 1:
AXLLM_DEVICES=0 axllm serve "$MODEL_DIR" --port 8000终端 2:
AXLLM_DEVICES=1 axllm serve "$MODEL_DIR" --port 8001终端 3:
AXLLM_DEVICES=2 axllm serve "$MODEL_DIR" --port 8002终端 4:
AXLLM_DEVICES=3 axllm serve "$MODEL_DIR" --port 8003每个终端出现以下信息后表示服务已经启动:
LLM init ok
OpenAI API Server starting on http://0.0.0.0:PORT
9.2 四卡服务一键管理脚本
将以下内容保存为:
/home/XXX/axcl-samples-main/ax-llm/axllm_4cards.sh#!/usr/bin/env bash
set -u
MODEL_DIR="${MODEL_DIR:-$HOME/axcl-samples-main/ax-llm/models/Qwen3-0.6B-GPTQ-Int4}"
PID_DIR="${PID_DIR:-$HOME/.local/run/axllm-4cards}"
LOG_DIR="${LOG_DIR:-$HOME/axllm-logs}"
mkdir -p "$PID_DIR" "$LOG_DIR"
start_one() {
local device="$1"
local port="$2"
local pid_file="$PID_DIR/card${device}.pid"
local log_file="$LOG_DIR/card${device}-port${port}.log"
if [[ -f "$pid_file" ]] && kill -0 "$(cat "$pid_file")" 2>/dev/null; then
echo "Card ${device} already running, PID=$(cat "$pid_file")"
return
fi
nohup env AXLLM_DEVICES="$device" \
axllm serve "$MODEL_DIR" --port "$port" \
>"$log_file" 2>&1 &
echo "$!" >"$pid_file"
echo "Started Card ${device}: port=${port}, PID=$!, log=${log_file}"
}
stop_one() {
local device="$1"
local pid_file="$PID_DIR/card${device}.pid"
if [[ ! -f "$pid_file" ]]; then
echo "Card ${device}: no PID file"
return
fi
local pid
pid="$(cat "$pid_file")"
if kill -0 "$pid" 2>/dev/null; then
kill "$pid"
echo "Stopped Card ${device}: PID=${pid}"
else
echo "Card ${device}: process not running"
fi
rm -f "$pid_file"
}
status_one() {
local device="$1"
local port="$2"
local pid_file="$PID_DIR/card${device}.pid"
if [[ -f "$pid_file" ]] && kill -0 "$(cat "$pid_file")" 2>/dev/null; then
echo "Card ${device}: RUNNING, PID=$(cat "$pid_file"), port=${port}"
else
echo "Card ${device}: STOPPED, port=${port}"
fi
}
case "${1:-}" in
start)
if [[ ! -d "$MODEL_DIR" ]]; then
echo "Model directory does not exist: $MODEL_DIR" >&2
exit 1
fi
start_one 0 8000
start_one 1 8001
start_one 2 8002
start_one 3 8003
;;
stop)
stop_one 0
stop_one 1
stop_one 2
stop_one 3
;;
restart)
"$0" stop
"$0" start
;;
status)
status_one 0 8000
status_one 1 8001
status_one 2 8002
status_one 3 8003
;;
logs)
tail -n 50 "$LOG_DIR"/*.log
;;
*)
echo "Usage: $0 {start|stop|restart|status|logs}"
exit 1
;;
esac添加执行权限:
chmod +x ~/axcl-samples-main/ax-llm/axllm_4cards.sh启动四个服务:
~/axcl-samples-main/ax-llm/axllm_4cards.sh start查看状态:
~/axcl-samples-main/ax-llm/axllm_4cards.sh status查看日志:
~/axcl-samples-main/ax-llm/axllm_4cards.sh logs停止服务:
~/axcl-samples-main/ax-llm/axllm_4cards.sh stop9.3 检查四个 HTTP 服务
for port in 8000 8001 8002 8003
do
    python3 -c "import urllib.request; print('$port:', urllib.request.urlopen('http://127.0.0.1:$port/health', timeout=10).read().decode())"
done
每个端口的健康接口应返回类似:
{
  "concurrency": 0,
  "max_concurrency": 1,
  "status": "healthy"
}
10. 四卡并发测试程序
将下面的程序保存为:
/home/XXX/axcl-samples-main/ax-llm/bench_four_cards.py#!/usr/bin/env python3
import hashlib
import json
import sys
import time
import urllib.request
from concurrent.futures import ThreadPoolExecutor, as_completed
DEFAULT_PORTS = [8000, 8001, 8002, 8003]
MODEL = "AXERA-TECH/Qwen3-0.6B-GPTQ-Int4"
PROMPT = (
"Write a numbered list from 1 to 100. "
"Each entry must contain the phrase: Edge AI accelerator benchmark test."
)
MAX_TOKENS = 256
REQUEST_TIMEOUT = 180
def request_one(port):
payload = {
"model": MODEL,
"messages": [
{"role": "user", "content": PROMPT},
],
"max_tokens": MAX_TOKENS,
"temperature": 0,
"stream": False,
}
body = json.dumps(payload).encode("utf-8")
request = urllib.request.Request(
f"http://127.0.0.1:{port}/v1/chat/completions",
data=body,
headers={"Content-Type": "application/json"},
method="POST",
)
started = time.perf_counter()
with urllib.request.urlopen(request, timeout=REQUEST_TIMEOUT) as response:
result = json.loads(response.read().decode("utf-8"))
elapsed = time.perf_counter() - started
text = result["choices"][0]["message"]["content"]
completion_tokens = int(result.get("usage", {}).get("completion_tokens", 0))
digest = hashlib.sha256(text.encode("utf-8")).hexdigest()[:16]
return {
"port": port,
"elapsed": elapsed,
"completion_tokens": completion_tokens,
"tokens_per_second": completion_tokens / elapsed if elapsed else 0.0,
"digest": digest,
"text": text,
}
def main():
ports = [int(value) for value in sys.argv[1:]] or DEFAULT_PORTS
results = []
failures = []
wall_started = time.perf_counter()
with ThreadPoolExecutor(max_workers=len(ports)) as executor:
futures = {executor.submit(request_one, port): port for port in ports}
for future in as_completed(futures):
port = futures[future]
try:
results.append(future.result())
except Exception as error:
failures.append((port, error))
wall_elapsed = time.perf_counter() - wall_started
results.sort(key=lambda item: item["port"])
failures.sort(key=lambda item: item[0])
print("\nIndividual results:")
for result in results:
print(
f"port={result['port']} "
f"elapsed={result['elapsed']:.2f}s "
f"completion_tokens={result['completion_tokens']} "
f"speed={result['tokens_per_second']:.2f} tokens/s "
f"hash={result['digest']}"
)
for port, error in failures:
print(f"port={port} FAILED: {error!r}")
total_tokens = sum(item["completion_tokens"] for item in results)
aggregate_speed = total_tokens / wall_elapsed if wall_elapsed else 0.0
unique_hashes = len({item["digest"] for item in results})
print("\nSummary:")
print(f"successful={len(results)}/{len(ports)}")
print(f"wall_time={wall_elapsed:.2f}s")
print(f"total_tokens={total_tokens}")
print(f"aggregate={aggregate_speed:.2f} tokens/s")
print(f"unique_output_hashes={unique_hashes}")
if __name__ == "__main__":
main()运行默认的四卡并发测试:
python3 ~/axcl-samples-main/ax-llm/bench_four_cards.py也可以在命令行指定部分端口,例如仅测试 8000:
python3 ~/axcl-samples-main/ax-llm/bench_four_cards.py 8000同时测试指定的两个端口:
python3 ~/axcl-samples-main/ax-llm/bench_four_cards.py 8000 800111. 测试时的监控命令
查看全部设备状态:
/usr/bin/axcl/axcl-smi每秒刷新一次:
watch -n 1 /usr/bin/axcl/axcl-smi每两秒刷新一次:
watch -n 2 /usr/bin/axcl/axcl-smi退出 watch:
Ctrl+C查看服务进程:
pgrep -af axllm查看监听端口:
ss -lntp | grep -E ':8000|:8001|:8002|:8003'12. 本次性能记录
使用 Qwen3-0.6B-GPTQ-Int4 模型测试得到的典型结果:
| 指标 | 结果 |
|---|---|
| 单卡 TTFT | 约 131 ms |
| 单卡 Decode 速度 | 约 15 tokens/s |
| 推理时单卡 NPU 使用率 | 约 50%~53% |
| 四卡运行方式 | 每张卡一个独立服务进程 |
| 四卡端口 | 8000~8003 |
四卡独立并发的理论聚合解码速度约为:
4 × 15 tokens/s ≈ 60 tokens/s实际聚合速度会受到每个请求的输出长度、结束标记、提示词长度和线程启动时间影响,因此应以并发脚本输出的 aggregate 为准。
13. 推荐的日常测试顺序
每次服务器重新启动后,可以按以下顺序操作:
- 确认四张卡:
/usr/bin/axcl/axcl-smi- 启动四卡服务:
~/axcl-samples-main/ax-llm/axllm_4cards.sh start- 等待四个模型完成初始化,然后查看服务状态:
~/axcl-samples-main/ax-llm/axllm_4cards.sh status- 检查四个健康接口:
   for port in 8000 8001 8002 8003
   do
       python3 -c "import urllib.request; print('$port:', urllib.request.urlopen('http://127.0.0.1:$port/health', timeout=10).read().decode())"
done- 开一个终端监控设备:
watch -n 1 /usr/bin/axcl/axcl-smi- 运行四卡并发测试:
python3 ~/axcl-samples-main/ax-llm/bench_four_cards.py- 测试结束后停止服务:
~/axcl-samples-main/ax-llm/axllm_4cards.sh stop14. 路径速查
| 内容 | 路径 |
|---|---|
| AXCL 头文件 | /usr/include/axcl |
| AXCL 库 | /usr/lib/axcl |
| AXCL-SMI | /usr/bin/axcl/axcl-smi |
| 卡端 PAC 固件 | /lib/firmware/axcl/ax650_card.pac |
| axllm 可执行文件 | /usr/bin/axllm |
| ax-llm 源码 | /home/XXX/axcl-samples-main/axllm/ax-llm |
| 模型目录 | /home/XXX/axcl-samples-main/ax-llm/models/Qwen3-0.6B-GPTQ-Int4 |
| 四卡管理脚本 | /home/XXX/axcl-samples-main/ax-llm/axllm_4cards.sh |
| 并发测试程序 | /home/XXX/axcl-samples-main/ax-llm/bench_four_cards.py |
| 四卡运行日志 | /home/XXX/axllm-logs |
文章评论